Bloques de programación LEGO® Powered UP
La app LEGO® Powered UP presenta un lenguaje de programación sencillo y fácil de entender con el que los fans de todas las edades disfrutarán aprender y experimentar. Se basa en la experiencia principal que cualquier fan de LEGO entenderá instintivamente: conectar bloques unos con otros y apreciar cómo encajan.
Los bloques de programación vienen en una gama de tipos y colores que le indican qué tipo de bloque está usando.
Aquí algunos ejemplos de bloques de programación usados habitualmente. Si no está seguro de lo que hace un bloque y no aparece aquí, puede probarlo en la app o consultar nuestra guía completa de programación de bloques. Parte de la diversión de LEGO Powered UP está en la experimentación, el juego y el aprendizaje.
 Bloques Amarillos de Flujo
Los bloques amarillos controlan el flujo de sus órdenes. Puede utilizarlos para iniciar, detener, pausar un programa, o, incluso, para órdenes en repeticion.
|
|
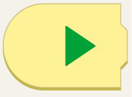
Este bloque inicia el programa. |
 |
Este bloque de reloj de arena hará que el programa espere durante un número determinado de segundos. |
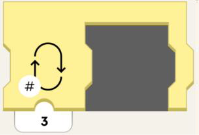 |
Este bloque realizará una repeticion en la sección del programa durante un número determinado de veces. |
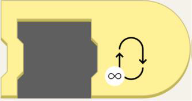 |
Este bloque ejecutará el programa en repeticion ¡para siempre! |
 Bloques Naranjas de Sensores
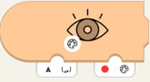
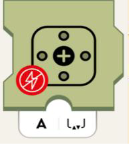
Los bloques naranjas funcionan con el control remoto y con los sensores de color y distancia, de inclinación del hub de movimiento y WeDo 2.0. Estos bloques generan una acción cuando un sensor de su modelo detecte algo.
|
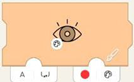
| Utilice el sensor de color para activar un evento cuando se detecte un color específico. |
 |
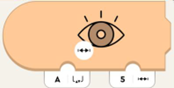
Espere a que el sensor de color detecte el color elegido en el bloque. |
|
| Obtenga el color actual detectado por el sensor. |
 | Obtenga el nivel de luz ambiental actual detectado por el sensor. |
|
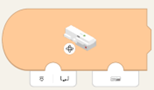
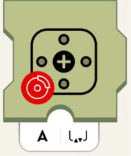
| Se activa cuando la distancia medida por el sensor es menor a la distancia especificada. |
|
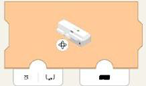
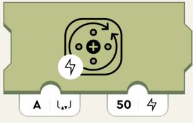
| Utilice el giróscopo interno para activar un evento basado en la orientación del hub. Espere a que la orientación del hub sea igual a la orientación del hub. |
|
| Espere a que la orientación hub sea igual a la orientación del hub. |

 Bloques Verdes de Motores o Movimiento
Los bloques verdes ponen su modelo en movimiento! Puede diferenciar entre motores Technic (para controlar la velocidad y la posición) y básicos (para conducir a toda velocidad).
|
| Ajuste la potencia del motor. Los números positivos giran en el sentido de las agujas del reloj y los numeros negativos, en el sentido contrario. |
 | Elimina la potencia del motor y hará que se detenga lentamente. |
 | Detiene el motor. |
 Bloques Morados de Luz y Sonido
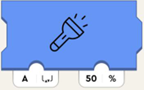
Los bloques morados pueden reproducir sonidos a través de los altavoces de su dispositivo, o cambiar el color de las luces en el move hub o los sensores de color y distancia. Estos bloques también controlan las luces LED.
|
| Ajusta el color LED del sensor. |
 | Ajusta el LED del hub para que muestre el color. |
 | Ajusta el brillo de la luz en lo que esta conectado al puerto especificado. |
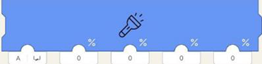 | Ajusta el brillo de la luz en el puerto conectado al puerto (parámetro izquierdo), pero ajusta individualmente los cuatro semicírculos del LED del sensor. De izquierda a derecha, afectan a:
|
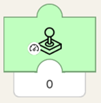
 | Reproduce el sonido seleccionado de la biblioteca de sonidos de casa. |
 | Reproduce el sonido seleccionado de la biblioteca de sonidos de silbido. |
 | Reproduce el sonido seleccionado de la biblioteca de sonidos de tren. |
 | Reproduce el sonido seleccionado de la biblioteca de sonidos de coche. |
 | Reproduce el sonido seleccionado de la biblioteca de sonidos de avión. |
 | Reproduce el sonido seleccionado de la biblioteca de sonidos de perro. |
 | Reproduce el sonido seleccionado de la biblioteca de sonidos de gato. |
 | Reproduce el sonido seleccionado de la biblioteca de sonidos de pedo. |
 | Reproduce el sonido seleccionado de la biblioteca de sonidos de bocina. |
 | Reproduce el sonido seleccionado de la biblioteca de sonidos de multitud.. |
 | Reproduce el sonido seleccionado de la biblioteca de sonidos de robot. |
 | Reproduce el sonido seleccionado de la biblioteca de sonidos de tiro al blanco. |

 Bloques de widget teal
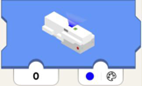
Los bloques de color verde azulado le permiten controlar su modelo con widgets.
|
| Informa el estado (verdadero/falso o 0/1) del widget de botón del lienzo con Channel-ID (primer parámetro). |
|
| Informa el estado (verdadero/falso o 0/1) del widget alternar del lienzo con Channel-ID (primer parámetro). |
 | Informa el estado del widget multibotón del lienzo con Channel-ID (primer parámetro), como eje. Esto significa: si pulsa el botón inferior, informa -100; si pulsa el superior, 100. Si no pulsa ninguno de las dos, 0. |
 | Ordena al velocímetro del lienzo del widget, al monitor de enteros o a cualquier otro monitor con Channel-ID (primer parámetro) que muestre el valor (segundo parámetro). |
 | Informa la posición (-100 a 100) del widget deslizador del lienzo con Channel-ID (primer parámetro). |
 | Informa la amplitud (-100 a 100) del joystick del lienzo del widget con Channel-ID (primer parámetro). Cuanto más se aleje el joystick del centro, mayor será el número. En la mitad superior del joystick, los números que se informan serán positivos. En la mitad inferior, negativos. |
 | Informa el ángulo (normalizado a: -100 a 100 no en grados, ¡lo que sería de -90 a 90!) del widget joystick del lienzo con Channel-ID (primer parámetro). Si el joystick apunta directamente hacia arriba o hacia abajo (independientemente de la amplitud), el bloque emite 0. Si se mueve la empuñadura del joystick en el sentido de las agujas del reloj, el número se vuelve negativo y disminuye hasta llegar a -100 directamente a la izquierda o a la derecha. Si se gira en sentido contrario a las agujas del reloj, el número es positivo y aumenta hacia 100. |


Si tiene preguntas sobre alguno de los bloques anteriores o necesita ayuda con cualquier otra cosa, póngase en contacto con nosotros.